General Office Software
I have the new version of Office 2007/2010 but don’t know how to use it
Office is the application suite created by Microsoft to enable people to create emails, write documents, produce spreadsheets and give presentations.
There have been several versions of this suite and the most recent is Office 2010. Office 2007 and 2010 ships with some PCs and laptops now but people don’t know how to use it or were used to the previous versions of Office.
We have created a quick reference guide which steps you through the basics, download it
here
. For a higher resolution version of this document, please let us
know
.
I need Acrobat Reader to view PDF files but don’t know how to configure it
Adobe Acrobat is an application designed to display Portable Document Format files (PDFs). These are files which can display rich and high quality images and text on a variety of devices but not take up much storage space on your hard drive.
The application should be installed on all PC’s and laptops as many companies send brochures and documentation electronically in this format however, Acrobat is not part of Windows, you can download it by clicking
here
.
When you run Acrobat for the first time, you should configure some settings which avoid complications when opening some documents in the future. If you do not complete these simple steps, you will find PDF documents take over your current browsing window and you will not be able to look at properties on the document such as file size or who created it etc and you may lose some functionality.
To configure Acrobat, complete these steps:
- Click on your Start Menu
- Click on ‘All Programs’
- Click on ‘Adobe’
- Open Acrobat
- Click on ‘Edit’
- Click on ‘Preferences’
- Select the ‘General’ category on the left:
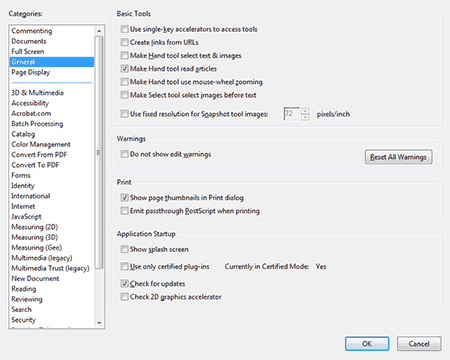
- ‘Un-tick’ the box labelled ‘Create Links from URLs’
Select the ‘Internet’ category:
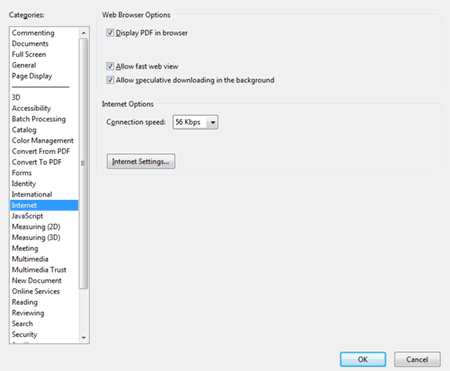
- ‘Un-tick’ the box labelled ’10. Display PDF in Browser’
- Click ‘OK’
- When you close Acrobat, your setting will take effect. You have completed configuration of the program.
I need to resize a photo but don’t have special software
Sometimes, if someone sends you an email or you download a photo from your digital camera or scanner, the finished result may be too big to use. You may want to upload a photo to a website which requires photos be of a maximum file size or less than a maximum dimension.
There are lots of ways you can do this but one of the most simple is to use a program which is found on most computers with Microsoft Office installed; Microsoft Picture Manager is a basic yet useful photo manipulation application.
To resize a photo:
- Firstly, you must ensure that you have the folder which houses your original photos set up using your ‘Add a Picture Shortcut’ button within Picture Manager
- Click on the folder name on the left hand menu which houses your photos e.g: ‘Desktop’ (or in our example ‘TEST’)
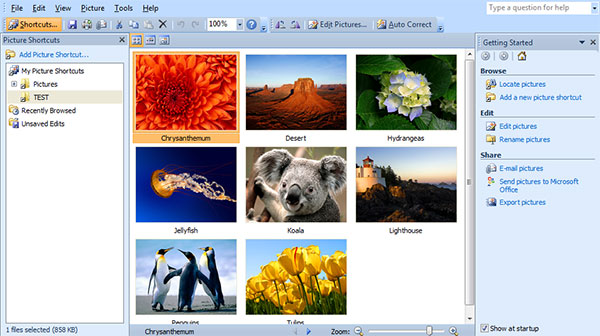
- You will see thumbnails for all of the photos in the folder
- Select the photo you wish you resize to highlight it (you will see the title and border change colour)
- If you want to resize more than one photo, select the photos to resize by holding ‘CTRL’ and left-clicking with your mouse to select all that you wish to edit then release the ‘CTRL’ button
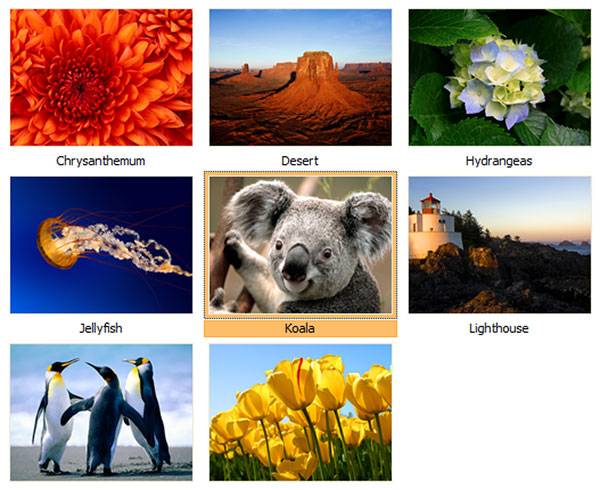
- If you want to resize more than one photo, select the photos to resize by holding ‘CTRL’ and left-clicking with your mouse to select all that you wish to edit then release the ‘CTRL’ button
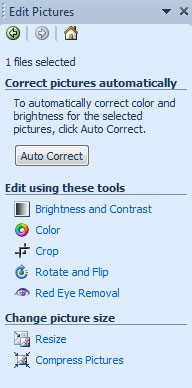
- Click ‘Edit Pictures…’ from the toolbar menu

- You will see the menu on the right will change, click on the ‘Resize’ link
- On the following screen, you have multiple options to resize photos by a percentage of their original size, set specific dimensions to resize to or one of the easiest methods is to use the drop down of predefined sizes. Choose ‘Web – Large (640 x 480px)
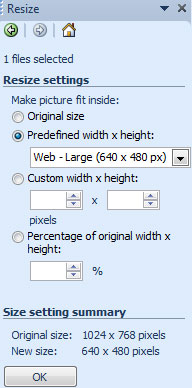
- Click ‘OK’
- You will see an ‘*’ appear before the title of the photo. This signifies that the photo has been changed but not saved yet. To do this, click the ‘Home’ icon in the right hand menu.
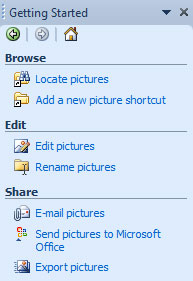
- Click ‘Export pictures’
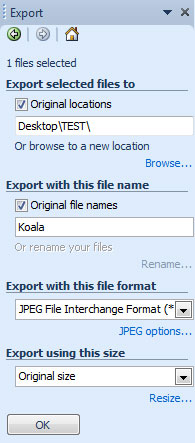
- On the screen which follows, you will choose where to save the photo to. For the purpose of this example, we are going to overwrite (replace) the original photo with the new, reszied one.
- If you did not want to overwrite the original simply, choose a different location to save the photo to by entering ‘resized’ after the ‘\\’ in the location box
- e.g; ‘Desktop\\TEST\\resized’.
- This will create a new folder called ‘resized’ and store your new photo there.
- If you did not want to overwrite the original simply, choose a different location to save the photo to by entering ‘resized’ after the ‘\\’ in the location box
- Leave the tick in the ‘original locations’ and ‘original file names’
- Choose ‘JPEG’ from the ‘Export with this file format’ drop down
- Choose ‘Original size’ from the ‘Export using this size’ drop down
- Click ‘OK’
- As we are replacing the original file, on the following screen, choose ‘Replace File’
- If you are resizing multiple files at once, select ‘Replace All’

- If you are resizing multiple files at once, select ‘Replace All’
- The file will then be saved and replaced. Your file has now been resized. You can now easily email, upload or embed the photos in documents.
I need the basics of Word 2007
Office is the application suite created by Microsoft to enable people to create emails, write documents, produce spreadsheets and give presentations.
There have been several versions of this suite and the most recent is Office 2010. Office 2007 or 2010 ships with some PCs and laptops now but people don’t know how to use it or were used to the previous versions of Office.
We have created a quick reference guide which steps you through the basics of using the word processing package; Word 2007, download it
here
. For a higher resolution version of this document, please
let us know
.
Email & Internet
Add my email account to Windows Live Mail
When you use Windows Live Mail, you can store all of your popular email addresses in your address book. This means you can quickly send an email without having to enter an email address every time. To add someone to your address book, follow these steps:
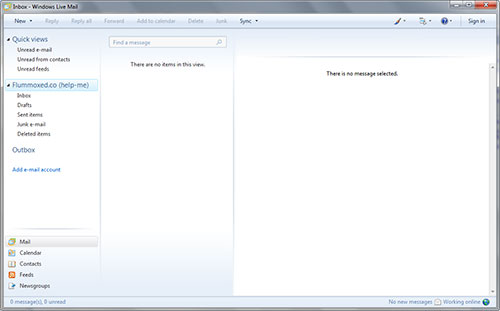
- Open Live Mail and you will see your inbox:
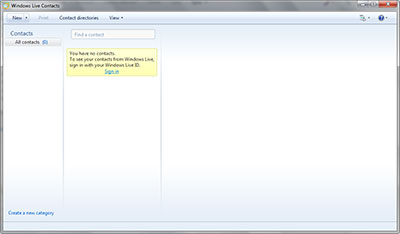
- Click ‘Contacts’ and if you have no entries, you will see an empty address book:
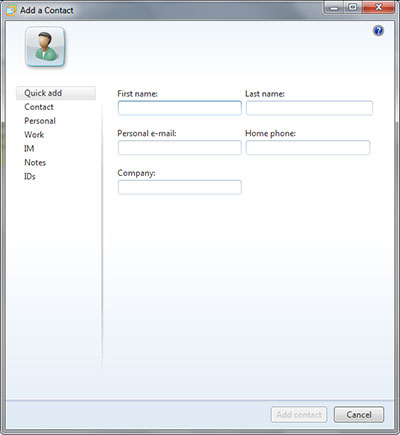
- Click ‘New’ and you will see the following screen:
- Enter the basic information for your address book entry:
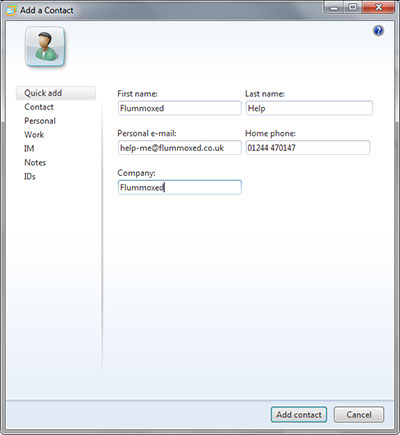
- Click ‘Add contact’ and you will be shown your address book, now you will see the new entry has been filled in:
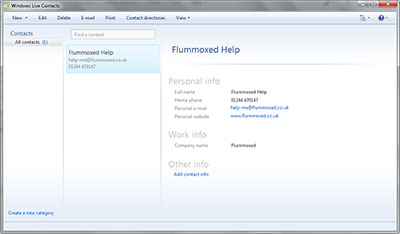
- Repeat the steps above until all the entries you need have been filled in
- Close your address book by clicking the red ‘x’ in the top right hand corner and you will be returned to your inbox
Outlook tells me it is in Cached Exchange Mode
Sometimes, when a PC or laptop is setup, Outlook automatically selects ‘Cached Exchange Mode’ (CEM).
CEM is primarilly used when you connected to a mail server or
host
your email somwwhere else. Ordinarily home users do not have this feature installed.
This setting works well for laptop users who are not always in communication with the Exchange/email server. This setting allows the computer to download information from the server such as address books, mail files and calendar entries so that when disconnected, the laptop user can still use their email.
When this setting is applied however, particularly to PC’s, this setting affects the ability of the computer to pick up changes reflected on the server such as the Global Address Lists or mailboxes. This normally shows itself by address books not updating or new email not showing up.
To check and change this setting:
Open Outlook
Click ‘Tools’
Email Accounts’
Click ‘View or Change’
Click ‘Change’
You will see your email account settings
Remove the tick from the ‘Use Cached Exchange Mode’ box
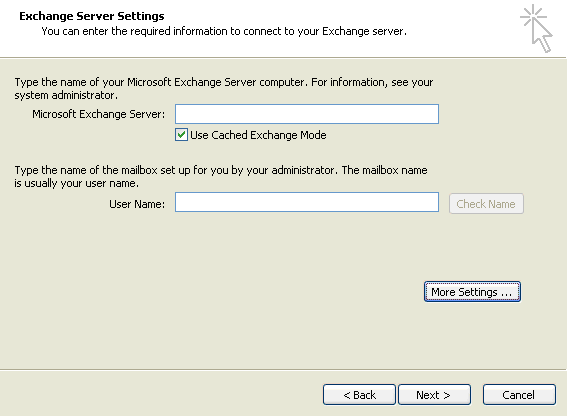
Click ‘Next’
Click ‘Finish’
You mailbox will then update after a few minutes and the changes which you are missing will be reflected.
How do you configure Internet Explorer?
The current browser for searching and viewing web pages from Microsoft is Internet Explorer (IE) 9 however many people still use IE6 or IE7. You can download IE7 from the
microsoft website
and it is automatically downloaded as a windows update. When you open Internet Explorer 7 for the first time, you may need to complete a simple setup process. To complete this procedure, please follow these steps:
- Open Internet Explorer by clicking on the Start Menu and selecting Internet Explorer
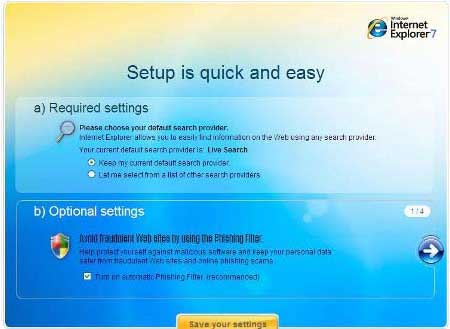
- Click ‘choose your settings’
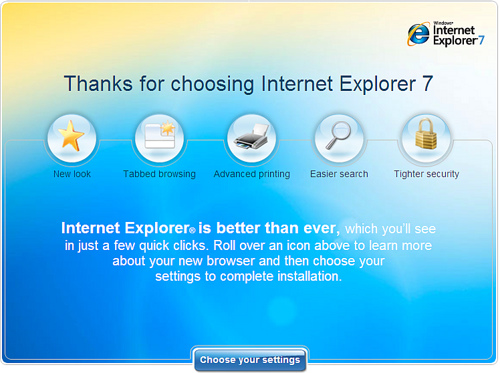
- You will see the following screen:
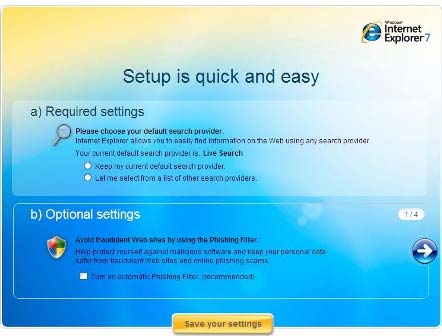
- Select ‘keep my current default search provider’ and ‘turn on automatic phishing filter’
- Click ‘Save your settings’
- You will see the following screen where you can click ‘go to your homepage’
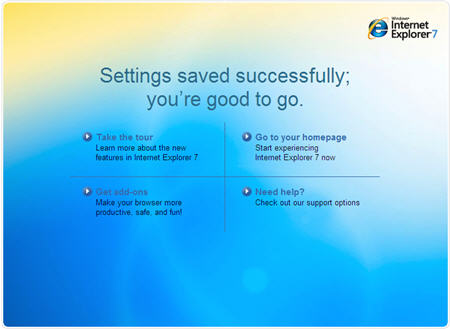
- From this point on, your homepage will be whatever you choose.
- To set your homepage:
- Click ‘Tools’
- Click ‘Internet Options’
- In the box at the top of the dialogue screen which appears, type a web address, e.g: https://www.flummoxed.co.uk
- Click ‘Apply’
- Click ‘OK’
- This will need to be done for any user who logs onto this machine but only once.
How do I save images from an Outlook email?
This page shows you how to create a VB Script which will allow you to save images embedded in your Outlook emails. You cannot save photos which have been embedded now. Until now, the only way around this was to copy the image into a graphics program and paste it, then save the files. Now, using these instructions, you can save images again:
- Click ‘Tools’
- Click ‘Macros’
- Click ‘Visual Basic Editor’
- Right-Click on ‘Project1
- ‘Click ‘Insert’
- Click ‘Module’
- Paste the following code:
Private Const BIF_RETURNONLYFSDIRS As Long = &H1 Private Const BIF_DONTGOBELOWDOMAIN As Long = &H2 Private Const BIF_RETURNFSANCESTORS As Long = &H8 Private Const BIF_BROWSEFORCOMPUTER As Long = &H1000 Private Const BIF_BROWSEFORPRINTER As Long = &H2000 Private Const BIF_BROWSEINCLUDEFILES As Long = &H4000 Private Const MAX_PATH As Long = 260 Function BrowseFolder(Optional Caption As String, _ Optional InitialFolder As String) As String Dim SH As Shell32.Shell Dim F As Shell32.Folder Dim WshShell As Object Set SH = New Shell32.Shell Set F = SH.BrowseForFolder(0&, Caption, BIF_RETURNONLYFSDIRS, InitialFolder) Set WshShell = CreateObject("WScript.Shell") If Not F Is Nothing Then 'Special folders don't always return their full path that is why we check the title first Select Case F.Title Case "Desktop" BrowseFolder = WshShell.SpecialFolders("Desktop") Case "My Documents" BrowseFolder = WshShell.SpecialFolders("MyDocuments") Case "My Computer" MsgBox "Invalid selection", vbCritical + vbOKOnly, "Error" Exit Function Case "My Network Places" MsgBox "Invalid selection", vbCritical + vbOKOnly, "Error" Exit Function Case Else BrowseFolder = F.Items.Item.Path End Select End If 'Cleanup Set SH = Nothing Set F = Nothing Set WshShell = Nothing End Function Sub SaveAttachment() 'Get all selected items Set MyOlApplication = CreateObject("Outlook.Application") Set MyOlNameSpace = MyOlApplication.GetNamespace("MAPI") Set MyOlSelection = MyOlApplication.ActiveExplorer.Selection 'Make sure at least one item is selected If MyOlSelection.Count = 0 Then Response = MsgBox("Please select an item first", vbExclamation, MyApplName) Exit Sub End If 'Make sure only one item is selected If MyOlSelection.Count > 1 Then Response = MsgBox("Please select only one item", vbExclamation, MyApplName) Exit Sub End If 'Retrieve the selected item Set MySelectedItem = MyOlSelection.Item(1) 'Retrieve all attachments from the selected item Dim colAttachments As Outlook.Attachments Dim objAttachment As Outlook.Attachment Set colAttachments = MySelectedItem.Attachments 'Here makes the user the folder selection Dim FolderPath As String FolderPath = BrowseFolder("Select a folder") If FolderPath = "" Then Response = MsgBox("Please select a folder. No items were saved", vbExclamation, MyApplName) Exit Sub End If 'Save all attachments to the selected location with a date and time stamp of message to generate a unique name Dim DateStamp As String Dim MyFile As String For Each objAttachment In colAttachments MyFile = objAttachment.FileName DateStamp = Format(MySelectedItem.CreationTime, " - yyyymmdd_hhnnss") intPos = InStrRev(MyFile, ".") If intPos > 0 Then MyFile = Left(MyFile, intPos - 1) & DateStamp & Mid(MyFile, intPos) Else MyFile = MyFile & "DateStamp" End If objAttachment.SaveAsFile (FolderPath & "\\\\\\\\\\\\\\\\" & MyFile) Next 'Cleanup Set objAttachment = Nothing Set colAttachments = Nothing Set MyOlApplication = Nothing Set MyOlNameSpace = Nothing Set MyOlSelection = Nothing Set MySelectedItem = Nothing End Sub - Click ‘Tools’
- Click ‘References’
- Select ‘Microsoft Shell Controls and Automation’
- Click ‘OK’
- Browse to the Self Cert application on your PC, usually in:
C:\\\\\\\\\\\\\\\\Program Files\\\\\\\\\\\\\\\\Microsoft Office\\\\\\\\\\\\\\\\Office - Run SelfCert, entering your name for the certificate
- Return to the VBEditor
- Click ‘Tools’
- Click ‘Digital Signature’
- Click ‘Choose’ and you should see the new certificate you created, select it and click OK
- Close the VBEditor
- In Outlook, customise the toolbar and choose the commands tab
- Select ‘Macros
- ‘Locate your new macro and drag it to the menu bar
- Click on ‘Modify Selection’ and set an icon for the button and a name which will mean something to you
- Click ‘Close’
That’s it! Youre done and you can now save those images again!
How do I add and scan photos using Windows Live Mail?
Many people want the option of being able to scan images, photos and documents and send them to friends and relatives around the world. This process is very simple and straight forward however, following the release of Windows Live Mail 2011, the process is a little more complicated but it’s still straight forward. What Windows Live Mail 2011 likes to do is scan an image and insert it (embed) it into your email. This has been proven to cause problems. Some of the image can be cut off and quite often, this embedding results in the email being sat in your ‘outbox’ which then causes a blockage and you can no longer send emails. The best way to send images and files is by attaching them, rather than embedding them. Basically, that means you send the file rather than make the picture appear within your email message. To send an attachment with Windows Live Mail, follow these steps. For this example, we will be using an Epson Scanner to scan a photo and send it using Windows Live Mail 2011 (Your programs and hardware may vary but the process is more or less the same). If you simply need to send an attachment, skip to step 9:
- Open your scanning software from the Start Menu

- Your scanning software will open
- Place your document on the scannerin the correct orientation
- Begin the scanning process by pressing ‘Scan’ NB: Do not choose a ‘scan to email’ option

- Your scanner will automatically detect the document, its type and colour range (unless you have chosen to use manual scanner settings)
- The final scan will automatically begin

- Once the scan is complete, the file will automatically be saved int he format you chose and in the location you specified in your scanner software setup. This is often your ‘My Pictures’ folder. The folder may automatically open

- You can see the new file listed, in this case, it has automatically been named ‘img001’
- Open Windows Live Mail and you will see your inbox

- Open a new message by clicking the ‘Email Message’ button, the new message window will appear

- Enter your recipient’s email address or look them up in your address book like normal
- Enter a subject for the message
- Place the cursor in the message body (the big white box at the bottom) but clicking anywhere in the white space
- Click the ‘Attach File’ button (the paperclip), the ‘Find File’ dialogue box will open NB: If the paperclip icon is not on your ‘Ribbon’ you can click on the ‘Insert’ or ‘Attach’ button and you should see the paperclip icon

- Navigate to the location of your scan (or other file – Ours was in our My Pictures folder)

- Double click on the file and you will be returned to your message and you will see your file has been attached at the top of the message

- Complete the composition of your message
- Once you’re finished, click ‘Send’ and your mail with its attachment(s) will be sent (and they shouldn’t get stuck in your outbox)
How do I send email with Windows Live Mail?
Sending email using Windows Live Mail is very simple and straight forward. Ensure you have
set up your email account
then follow these simple steps:
- Open Windows Live Mail from your Start Menu (if it is your default mail programme, it should appear at the top of your Start Menu)
- You will be shown your inbox:

- Click ‘New’ and the New Message window will be displayed:
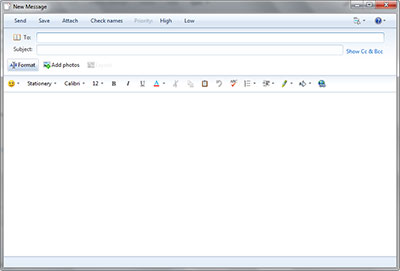
- Choose who you want to send the email to by clicking the ‘To:’ button or typing their email address in the box alongside ‘To:’. If you click the button, your address book will open and you will a screen similar to this:
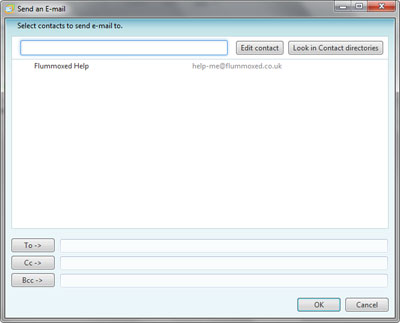
- Locate the name of the person you want to send an email to and left’click’ the name to highlight it:
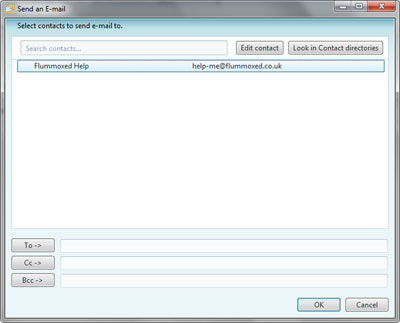
- Once you have selected the recipiant name, click the ‘To ->’ button and the name should appear ie box alongisde:
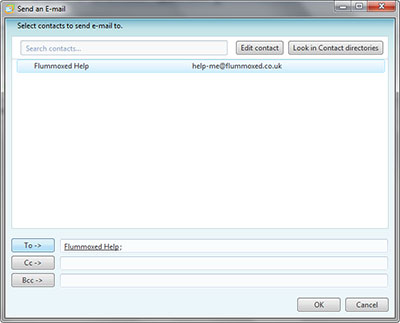
- Click ‘OK’ and you will be returned to your new email and you will the recipiant name is now in the ‘To:’ box:
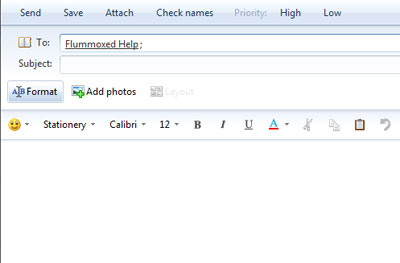
- Left-click into the ‘Subject:’ box and enter a subject for the email eg: ‘Test’
- Left-click into the main white box and begin typing your message:
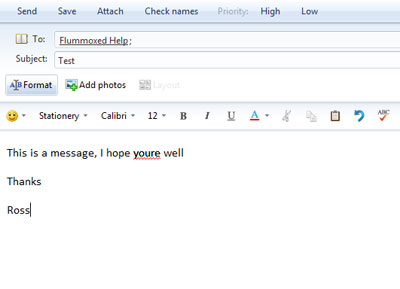
- You will notice that any mis-spelt words will appear with a red, wavey underline, to correct this misspelling, you can correct your spellings before sending the email or you can ignore them and skip straight to sending the message (step 12)
- To correct the spellings:
- Right-click on the word which is underlined. A list of suggestions will appear:
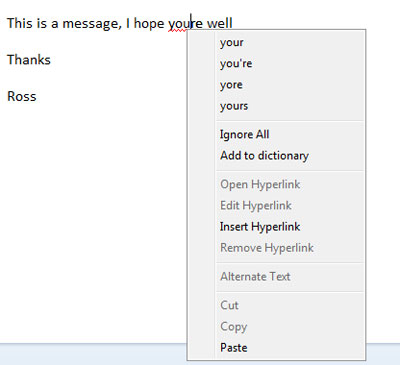
- Left-click the word to use instead and Live Mail will correct the spelling.
- If the word is correctly spelt for example a name or place, you can choose ‘Add to dictionary’ and you wont be reminded about this word again. You can also ignore all instances where Live Mail thinks you have misspelt something
- Right-click on the word which is underlined. A list of suggestions will appear:
- Once you are happy that your message is complete, click ‘Send’ and your message will sent the next time you connect to the internet. To send your message immediaely, press the ‘Sync’ button on the top menu.
How do I setup Windows Live Mail for my email?
Windows Live Mail is the replacement for Outlook Express which used to be used as the free email software which was part of Windows 95 to Windows XP. Windows Live Mail was released when Windows Vista was brought out as a new, slicker, more user-friendly email programme. In order to use Live Mail, you will need to set up an account. The first time you open Live Mail, the set up process starts automatically. Set set up your account follow these steps:
- Open Windows Live Mail
- The account setup will load and you will see the following screen:
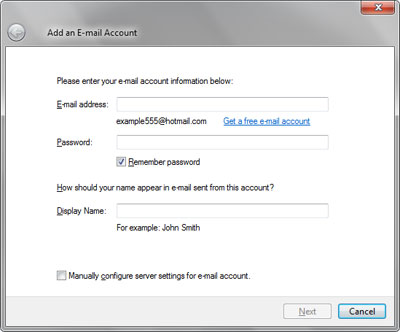
- Complete the boxes:
- Enter your email address, eg: joe@bloggs.co.uk
- Enter the password for your mailbox and ensure the ‘Remember Password’ box is ticked
- Enter your display name, this is the how you want your name to appear when you send an email to someone eg: ‘J Bloggs’
- The ‘Next’ button will become enabled
- Click the ‘Next’ button and you will see the following screen:
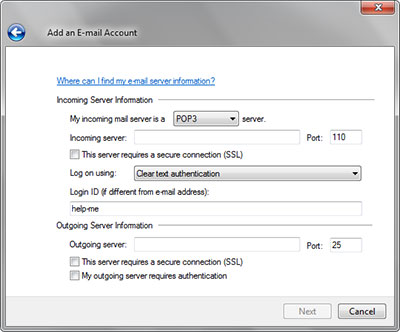
- Complete the following information (your Internet Service Provider [ISP] may need to tell you how to configure your settings):
- Choose the server type:
- POP3 (default) – this type means that when you connect, your mail will be downloaded then deleted from the server. Your computer will store the emails until you delete them
- IMAP – this means that you will see the same email as you see in the web version of your mailbox. Mail wont be downloaded and deleted however, if you delete an email from your inbox, it will then be deleted from the server. Remember, if you use this option, any mail left in your mailbox will count toward a mail file limit.
- Enter your incoming mail server eg: ‘pop.email.co.uk’
- Enter your login name, eg: ‘jbloggs’
- Enter your Outgoing Server eg: ‘smtp.email.co.uk’
- Tick the box which states ‘My outgoing server requires authentication’ (this is usually required however, if you cannot send email, check with your ISP)
- Choose the server type:
- Click ‘Next’ and you will be shown your inbox

- The name of the new email account will appear on the left in the list of your mail folders, in this example ‘flummoxed (help-me)’
How do I make advanced settings changes in Windows Live Mail?
Windows Live Mail is a great, free programme for email and RSS feeds. You can also use it for a calendar and storing all of your contacts. Sometimes, you may need to change the settings of your mail accounts if you need to adjust settings such as the ports used or the type of connections used. To edit an account, follow these steps:
- Open Windows Live Mail, you will see your inbox

- Click on the menu bar as shown to ensure the file menu is shown:
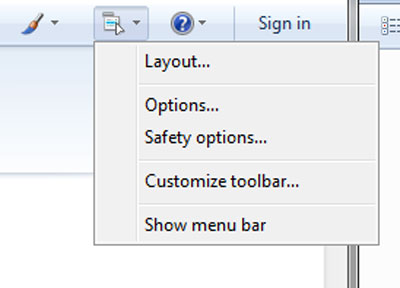
- Click ‘show file menu’, the file menu should appear
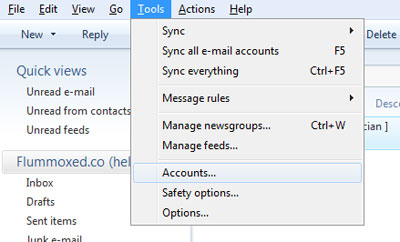
- Click ‘Tools’
- Click on ‘Accounts’, a list of your email accounts will be shown:
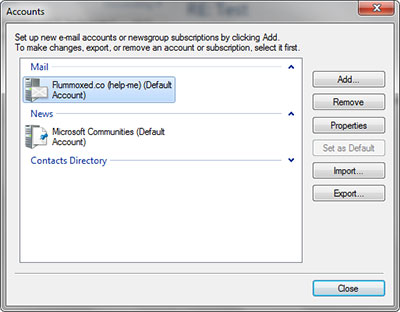
- Double-click on the account you want to edit and you will see the main settings displayed:
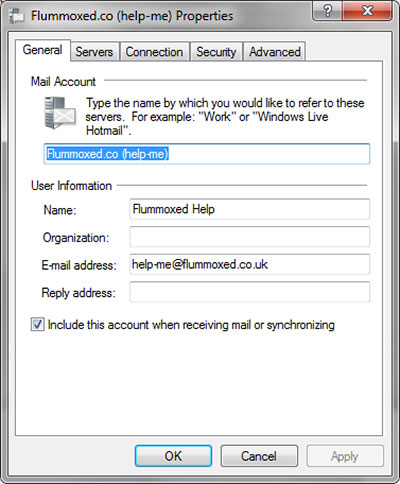
- Edit any settings necessary. You can change the name which appears in your inbox for your accounts by changing the first field shown, eg: Flummoxed.co (help-me)
- Click on the ‘advanced’ tab and this will enable you to change settings such as leaving emails on the server. This is a great option if you have a POP3 email account but don’t want to delete the emails from the server, thereby allowing you to access them somewhere else as well as on your computer.
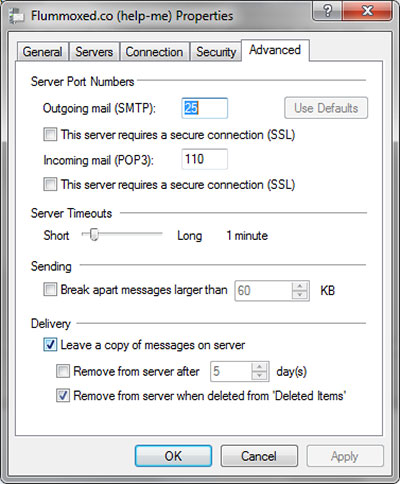
- When you have finished, click ‘OK’ and you will be returned to your inbox.
How do I change my password in Live Mail?
Windows Live Mail is very useful for a free email program but can be a pain if you don’t know where things are when you need to update them.
If you change your password on your email account, you will need to tell Live Mail that you have changed it, otherwise, it will bombard you with messages saying there was an error connecting to your account.
To change your password:
- Open Live Mail
- Click on the Accounts tab at the top of the screen

- Click on the ‘@’ symbol which is titled ‘Properties’
- Click on the ‘Servers’ tab

- Change the settings on this screen to reflect your new password. If you have been using Live Mail up to this point successfully, then you need only change the password. Simply enter your password into the password box, overwriting the contents which were already present.
- Click OK and close Live Mail
- Open Live Mail and test the new password works.
Other Software Problems
I have a DVD I want to back it up
Sometimes, if you enjoy watching DVDs a lot, you may know that they can become worn and scratched. Also, if you lend people your DVDs for them to watch, it may be wise to take a backup of your DVD to ensure that you have a copy of it in pristine condition. There are many ways to do this, however, this example talks about creating a copy using DVD Shrink and storing the file to your computer hard drive. If you use a program such as Nero or DVD Decrypter, you can also use these programs to burn a new copy of the DVD after you have completed these steps.
In order to copy a DVD, you need to ‘
decrypt
‘ it first to enable you to backup only the portions of the DVD that you actually need. To do this, you must first download and install
DVD Shrink
. This program is useful as it can do everything you need to in one application.
Once you have installed
DVD Shrink
follow these instructions to backup your DVD:
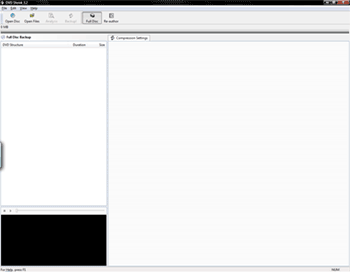
- Open DVD Shrink and you will see the following screen:
- Insert the DVD to be backed up in your DVD-drive and wait a couple of seconds for your PC to recognise it
- Click on the ‘Open Disc’ button
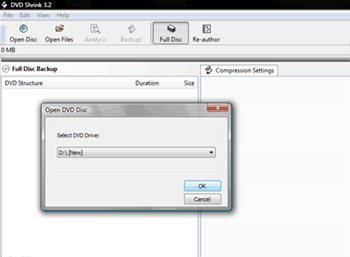
- Choose your DVD drive from the drop down list. You should see the drive letter, e.g: ‘D:\\\\\\\\\\\\\\\\\\\\\\\\\\\\\\\\\\\\\\\\\\\\\\\\\\\\\\\\\\\\\\\\\\\\\\\\\\\\\\\\\\\\\\\\\\\\\\\\\\\\\\\\\\\\\\\\\\\\\\\\\\\\\\\\\\\\\\\\\\\\\\\\\\\\\\\\\\\\\\\\\\\\\\\\\\\\\\\\\\\\\\\\\\\\\\\\\\\\\\\\\\\\\\\\\\\\\\\\\\\\\\\\\\\\\\\\\\\\\\\\\\\\\\\\\\\\\\\\\\\\\\\\\\\\\\\\\\\\\\\\\\\\\\\\\\\\\\\\\\\\\\\\\\\\\\\\\\\\\\\\\\\\\\\\\\\\\\\\\\\\\\\\\\\\\\\\\\\\\\\\\\\\\\\\\\\\\\\\\\\\\\\\\\\\\\\\\\\\\\\\\\\\\\\\\\\\\\\\\\\\\\\\\\\\\\\\\\\\\\\\\\\\\\\\\\\\\\\\\\\\\\\\\\\\\\\\\\\\\\\\\\\\\\\\\\\\\\\\\\\\\\\\\\\\\\\\\\\\\\\\\\\\\\\\\\\\\\\\\\\\\\\\\\\\\\\\\\\\\\\\\\\\\\\\\\\\\\\\\\\\\\\\\\\\\\\\\\\\\\\\\\\\\\\\\\\\\\\\\\\\\\\\\\\\\\\\\\\\\\\\\\\\\\\\\\\\\\\\\\\\\\\\\\\\\\\\\\\\\\\\\\\\\\\\\\\\\\\\\\\\\\\\\\\\\\\\\\\\\\\\\\\\\\\\\\\\\\\\\\\\\\\\\\\\\\\\\\\\\\\\\\\\\\\\\\\\\\\\\\\\\\\\\\\\\\\\\\\\\\\\\\\\\\\\\\\\\\\\\\\\\\\\\\\\\\\\\\\\\\\\\\\\\\\\\\\\\\\\\\\\\\\\\\\\\\\\\\\\\\\\\\\\\\\\\\\\\\\\\\\\\\\\\\\\\\\\\\\\\\\\\\\\\\\\\\\\\\\\\\\\\\\\\\\\\\\\\\\\\\\\\\\\\\\\\\\\\\\\\\\\\\\\\\\\\\\\\\\\\\\\\\\\\\\\\\\\\\\\\\\\\\\\\\\\\\\\\\\\\\\\\\\\\\\\\\\\\\\\\\\\\\\\\\\\\\\\\\\\\\\\\\\\\\\\\\\\\\\\\\\\\\\\\\\\\\\\\\\\\\\\\\\\\\\\\\\\\\\\\\\\\\\\\\\\\\\\\\\\\\\\\\\\\\\\\\\\\\\\\\\\\\\\\\\\\\\\\\\\\\\\\\\\\\\\\\\\\\\\\\\\\\\\\\\\\\\\\\\\\\\\\\\\\\\\\\\\\\\\\\\\\\\\\\\\\\\\\\\\\\\\\\\\\\\\\\\\\\\\\\\\\\\\\\\\\\\\\\\\\\\\\\\\\\\\\\\\\\\\\\\\\\\\\\\\\\\\\\\\\\\\\\\\\\\\\\\\\\\\\\\\\\\\\\\\\\\\\\\\\\\\\\\\\\\\\\\\\\\\\\\\\\\\\\\\\\\\\\\\\\\\\\\\\\\\\\\\\\\\\\\\\\\\\\\\\\\\\\\\\\\\\\\\\\\\\\\\\\\\\\\\\\\\\\\\\\\\\\\\\\\\\\\\\\\\\\\\\\\\\\\\\\\\\\\\\\\\\\\\\\\\\\\\\\\\\\\\\\\\\\\\\\\\\\\\\\\\\\\\\\\\\\\\\\\\\\\\\\\\\\\\\\\\\\\\\\\\\\\\\\\\\\\\\\\\\\\\\\\\\\\\\\\\\\\\\\\\\\\\\\\\\\\\\\\\\\\\\\\\\\\\\\\\\\\\\\\\\\\\\\\\\\\\\\\\\\\\\\\\\\\\\\\\\\\\\\\\\\\\\\\\\\\\\\\\\\\\\\\\\\\\\\\\\\\\\\\\\\\\\\\\\\\\\\\\\\\\\\\\\\\\\\\\\\\\\\\\\\\\\\\\\\\\\\\\\\\\\\\\\\\\\\\\\\\\\\\\\\\\\\\\\\\\\\\\\\\\\\\\\\\\\\\\\\\\\\\\\\\\\\\\\\\\\\\\\\\\\\\\\\\\\\\\\\\\\\\\\\\\\\\\\\\\\\\\\\\\\\\\\\\\\\\\\\\\\\\\\\\\\\\\\\\\\\\\\\\\\\\\\\\\\\\\\\\\\\\\\\\\\\\\\\\\\\\\\\\\\\\\\\\\\\\\\\\\\\\\\\\\\\\\\\\\\\\\\\\\\\\\\\\\\\\\\\\\\\\\\\\\\\\\\\\\\\\\\\\\\\\\\\\\\\\\\\\\\\\\\\\\\\\\\\\\\\\\\\\\\\\\\\\\\\\\\\\\\\\\\\\\\\\\\\\\\\\\\\\\\\\\\\\\\\\\\\\\\\\\\\\\\\\\\\\\\\\\\\\\\\\\\\\\\\\\\\\\\\\\\\\\\\\\\\\\\\\\\\\\\\\\\\\\\\\\\\\\\\\\\\\\\\\\\\\\\\\\\\\\\\\\\\\\\\\\\\\\\\\\\\\\\\\\\\\\\\\\\\\\\\\\\\\\\\\\\\\\\\\\\\\\\\\\\\\\\\\\\\\\\\\\\\\\\\\\\\\\\\\\\\\\\\\\\\\\\\\\\\\\\\\\\\\\\\\\\\\\\\\\\\\\\\\\\\\\\\\\\\\\\\\\\\\\\\\\\\\\\\\\\\\\\\\\\\\\\\\\\\\\\\\\\\\\\\\\\\\\\\\\\\\\\\\\\\\\\\\\\\\\\\\\\\\\\\\\\\\\\\\\\\\\\\\\\\\\\\\\\\\\\\\\\\\\\\\\\\\\\\\\\\\\\\\\\\\\\\\\\\\\\\\\\\\\\\\\\\\\\\\\\\\\\\\\\\\\\\\\\\\\\\\\\\\\\\\\\\\\\\\\\\\\\\\\\\\\\\\\\\\\\\\\\\\\\\\\\\\\\\\\\\\\\\\\\\\\\\\\\\\\\\\\\\\\\\\\\\\\\\\\\\\\\\\\\\\\\\\\\\\\\\\\\\\\\\\\\\\\\\\\\\\\\\\\\\\\\\\\\\\\\\\\\\\\\\\\\\\\\\\\\\\\\\\\\\\\\\\\\\\\\\\\\\\\\\\\\\\\\\\\\\\\\\\\\\\\\\\\\\\\\\\\\\\\\\\\\\\\\\\\\\\\\\\\\\\\\\\\\\\\\\\\\\\\\\\\\\\\\\\\\\\\\\\\\\\\\\\\\\\\\\\\\\\\\\\\\\\\\\\\\\\\\\\\\\\\\\\\\\\\\\\\\\\\\\\\\\\\\\\\\\\\\\\\\\\\\\\\\\\\\\\\\\\\\\\\\\\\\\\\\\\\\\\\\\\\\\\\\\\\\\\\\\\\\\\\\\\\\\\\\\\\\\\\\\\\\\\\\\\\\\\\\\\\\\\\\\\\\\\\\\\\\\\\\\\\\\\\\\\\\\\\\\\\\\\\\\\\\\\\\\\\\\\\\\\\\\\\\\\\\\\\\\\\\\\\\\\\\\\\\\\\\\\\\\\\\\\\\\\\\\\\\\\\\\\\\\\\\\\\\\\\\\\\\\\\\\\\\\\\\\\\\\\\\\\\\\\\\\\\\\\\\\\\\\\\\\\\\\\\\\\\\\\\\\\\\\\\\\\\\\\\\\\\\\\\\\\\\\\\\\\\\\\\\\\\\\\\\\\\\\\\\\\\\\\\\\\\\\\\\\\\\\\\\\\\\\\\\\\\\\\\\\\\\\\\\\\\\\\\\\\\\\\\\\\\\\\\\\\\\\\\\\\\\\\\\\\\\\\\\\\\\\\\\\\\\\\\\\\\\\\\\\\\\\\\\\\\\\\\\\\\\\\\\\\\\\\\\\\\\\\\\\\\\\\\\\\\\\\\\\\\\\\\\\\\\\\\\\\\\\\\\\\\\\\\\\\\\\\\\\\\\\\\\\\\\\\\\\\\\\\\\\\\\\\\\\\\\\\\\\\\\\\\\\\\\\\\\\\\\\\\\\\\\\\\\\\\\\\\\\\\\\\\\\\\\\\\\\\\\\\\\\\\\\\\\\\\\\\\\\\\\\\\\\\\\\\\\\\\\\\\\\\\\\\\\\\\\\\\\\\\\\\\\\\\\\\\\\\\\\\\\\\\\\\\\\\\\\\\\\\\\\\\\\\\\\\\\\\\\\\\\\\\\\\\\\\\\\\\\\\\\\\\\\\\\\\\\\\\\\\\\\\\\\\\\\\\\\\\\\\\\\\\\\\\\\\\\\\\\\\\\\\\\\\\\\\\\\\\\\\\\\\\\\\\\\\\\\\\\\\\\\\\\\\\\\\\\\\\\\\\\\\\\\\\\\\\\\\\\\\\\\\\\\\\\\\\\\\\\\\\\\\\\\\\\\\\\\\\\\\\\\\\\\\\\\\\\\\\\\\\’ followed by the title of the DVD in the drive
- Click ‘OK’ to open the disc
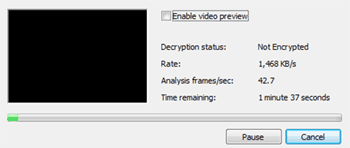
- You will see the ‘analyse DVD’ screen as above and the machine will begin to open the DVD
- Ensure the ‘Enable video preview’ tick box is unticked as this will slow down the speed of the analysis
- Once the DVD has been analysed, you will see the following screen:
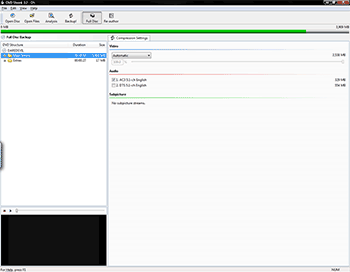
- On the left are the sections on the DVD such as the main title, the menu system and extras. The green bar at the top shows how full the DVD is. You should notice that the ‘Full Disc’ button is depressed
- Click the ‘Re-author’ button
- You will be shown a similar screen but with the ‘DVD Broswer’ tab selected on the right and an empty list in the left-hand ‘DVD Structure’ pane
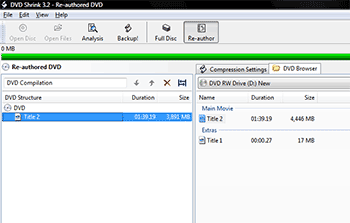
- From the list of files on the right-hand side, locate the main title for the DVD, usually named ‘Title 1’. Check that the file is the biggest file on the DVD as this will be the main content. If there are more than one film or programme on the DVD, select the files you want to keep and drag them into the ‘DVD Structure’ window on the left
- Once you have the files you nee in the left-hand window, click on the ‘Compression Settings’ tab after highlighting the main title.
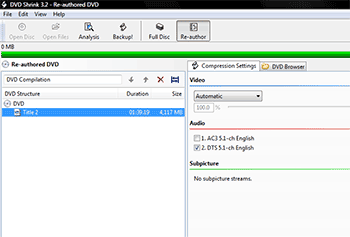
- Un-tick the check boxes along side all of the components which you do not need such as subtitles, other language audio tracks or any audio which you do not need. You will notice the compression level change for the video file and the green bar will lengthen and shorten depending on how much space is left on the disc. You want to try and avoid the compression level falling below 70% as this will result in poor picture quality
- Once you have completed the above step for all files you want to keep, click the ‘Backup!’ button to start to save your backup
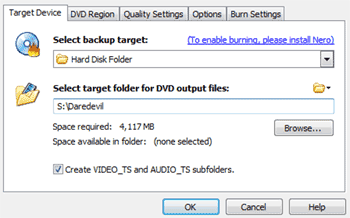
- Ensure you have the ‘backup target’ set to ‘Hard Disk Folder’. Enter the path or browse to the location where you want to save your file. If the folder does not exist, DVD Shrink will create the folder for you. It is advisable to name the folder something memorable, in this case ‘Daredevil’ being the name of the film being backed up.
- Ensure the ‘Create VIDEO_TS and AUDIO_TS subfolders’ check-box is ticked
- Click OK to begin saving the file
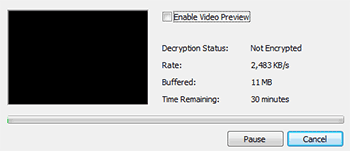
- You will see the above ‘Encoding DVD’ screen. Again, ensure the ‘Enable Video Previw’ check-box is unticked as this will slow the process down. Try and avoid using your PC or allowing the screen saver to come on during this action as this can cause errors in the ‘encryption’ of the disc. The process can take between 25-90 minutes depending on the amount being backed up, the compression level and the power of your PC
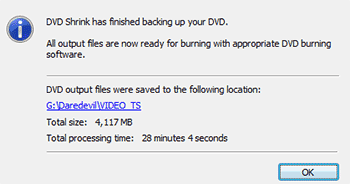
- Once the action is complete, you will see the following screen:
- Click ‘OK’
- Your DVD has now been backed up. You can now store the files and create a new DVD using Nero or DVD Decrypter. It is also possible to
add the files to a Media Center
to view at a later stage.
I have a Blue Screen of Death (BSOD)
Sometimes, if a new peice of hardware is installed or changes are made to the software of a PC or laptop, some of the files used by the Operating System (the software that runs the actual PC e.g; Windows) can become
corrupt
or even deleted. If this happens, on occasion, the PC cannot start and sometimes, when you switch your PC on, you will see a BlueScreen of Death (BSOD).
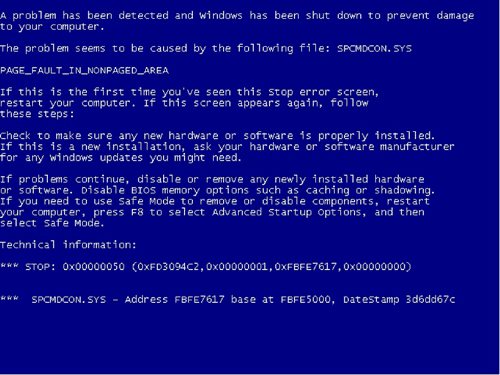
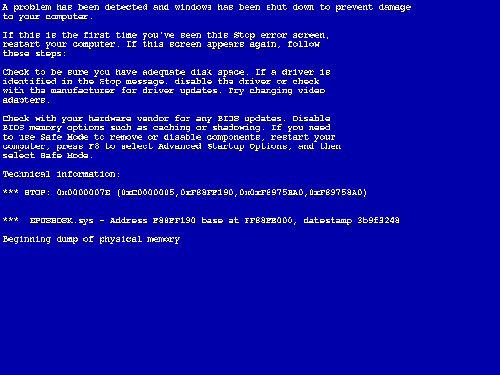
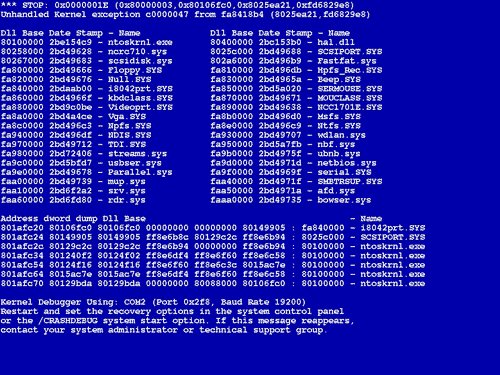
There are a number of different screens, all of which look pretty scary but mainly mean the same; that something has damaged some of the files on the PC or an item of hardware is connect which is causing a conflict. If you think of the membory in your PC as a book shelf, sometimes, a change can allocate the bit of memory/the space ont he shelf which belongs to something else. That’s when the compunter gets confused and a conflict occurs.
These are some examples of a BSOD:
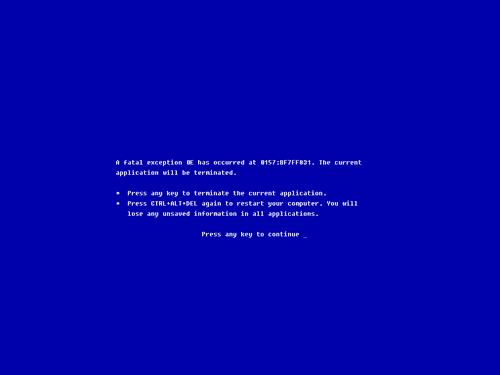
Should you find yourself confronted by a BSOD, don’t panic. In the first instance, reboot the PC, turn it off and on again, waiting 30 seconds before you switch it back on. 9 out 10 BSOD’s can be resolved just by performing this simple action.
If your PC doesn’t clear and you get a BSOD for a second or third time, try and make a note of the ‘STOP’ error, this can help an IT technician to isolate the cause of the fault.
Call us or email us
from another machine and we will try and assist you. This may involve your PC being ‘
reimaged
‘ which will erase the contents of your PC so always ensure you save your data to another location as a backup such as CD-ROM or USB memory stick/flash drive.
In order to access some network drives, it may be necessary to ‘map a network drive’. A network drive is somewhere that files are stored but which are not on your computer. These files can be stored online (in an FTP site), on another computer or on a server.
In order to do connect to the other location, you need to know the name and the server or computer of the drive you are trying to access.
The name of the drive will be shown on someone else’s computer who is already connected, if you have connected to the computer or server before, it will be in your recently connected list or otherwise, your service provider will have given you the address or IP address of the drive.
If someone else you know also uses the same drive, ask them to open up My Computer. You will see mapped drives in a category called ‘Network Drives’, they are shown in such a way as being identified as ‘Storage on Flummoxed-1’ for example.
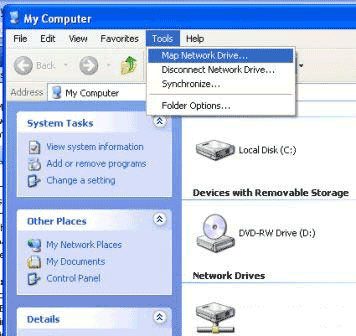
In our example, we will connect to ‘Storage’ which is the name of the folder and ‘Flummoxed-1’ is the server name.
To map a network drive:
- Open ‘My Computer’
- Click on ‘Tools’ then ‘Map Network Drive…’
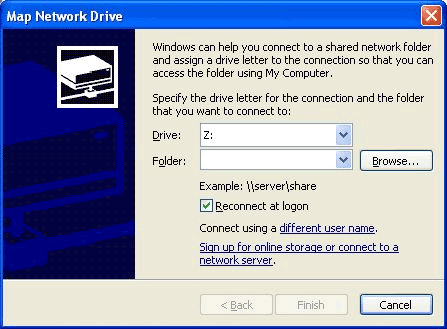
- In the screen which appears select the drive letter you want to map your drive as e.g: ‘S’ for ‘Storage’ – the letter can be anything you choose
- In the ‘Folder’ box, type the path to the ‘share’ (the folder you want to map) you want to map as shown in the format \\\\\\\\\\\\\\\\\\\\\\\\\\\\\\\\\\\\\\\\\\\\\\\\\\\\\\\\\\\\\\\\\\\\\\\\\\\\\\\\\\\\\\\\\\\\\\\\\\\\\\\\\\\\\\\\\\\\\\\\\\\\\\\\server\\\\\\\\\\\\\\\\\\\\\\\\\\\\\\\\\\\\\\\\\\\\\\\\\\\\\\\\\\\\\\\\folder for example: \\\\\\\\\\\\\\\\\\\\\\\\\\\\\\\\\\\\\\\\\\\\\\\\\\\\\\\\\\\\\\\\\\\\\\\\\\\\\\\\\\\\\\\\\\\\\\\\\\\\\\\\\\\\\\\\\\\\\\\\\\\\\\\\Flummoxed-1\\\\\\\\\\\\\\\\\\\\\\\\\\\\\\\\\\\\\\\\\\\\\\\\\\\\\\\\\\\\\\\\Storage
- If you want to connect to the drive every time you log-on to your machine, ensure the ‘Reconnect at logon’ box is ticked otherwise untick it and it will not be reconnected after you reboot.
- Click ‘Finish’ and providing everything is OK, the folder will open in a new window
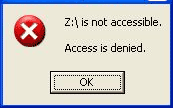
NB: In order to map a drive, you must have permission to access the folder. If you do not have access, you will receive the error message shown below:
I’m having problems with Media Center’s EPG
Anyone running Windows Media Centre will be familiar with the programme/TV guide/EPG.
Sometimes, the file which runs the guide can become corrupt or does not download correctly from the Internet.
There are a couple of ways you can fix the problem when you see a screen similar to this one:
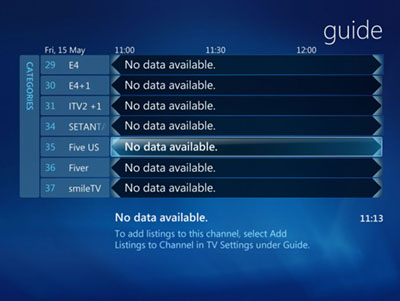
Download the latest Guide file
- Move the cursor to the left so that you highlight one of the station numbers, not the ‘Categories’ menu button
- Press the ‘i’ or ‘information’ button your remote
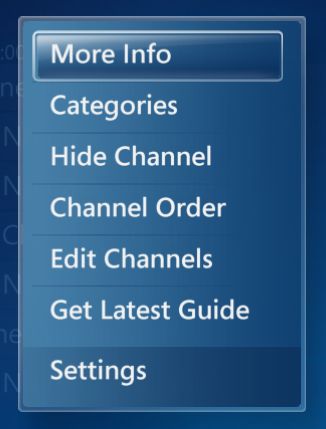
- Choose ‘Get latest Guide’
- You be asked if you want to be notified when the download is complete, say ‘Yes’
- Once the file is downloaded, you will be notified
- Reboot the PC and see if the guide works. If it didn’t work, try the next option.
Configure your TV signal again
Try configuring your TV signal again. This action should erase and reset the contents of the eHome folder which is where the guide is installed.
- Press the Green button on your remote
- Go to ‘Tasks’
- Go to ‘Settings’
- Go to ‘TV’
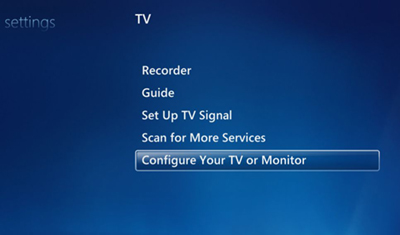
- Select ‘Set Up TV Signal’
- Follow the set up again as instructed
- Reboot the PC and see if the guide works. If it didn’t work, try the next option.
Change the guide to manual
If that doesn’t work, this final option may well do.
- Set VMC to ‘Manual download’ instead of ‘Download when connected’ in VMC Guide settings and then close Media Center
- Stopped & Disabled these services :-
- “Windows Media Center Receiver Service”
- “Windows Media Center Scheduler Service”
- Right click on folder c:\\\\\\\\\\\\\\\\\\\\\\\\\\\\\\\\ProgramData\\\\\\\\\\\\\\\\\\\\\\\\\\\\\\\\Microsoft\\\\\\\\\\\\\\\\\\\\\\\\\\\\\\\\eHome then click Properties and select ‘Previous Versions’
- Open previous version of folder from yesterday or the day before (whichever is showing)
- Delete contents of c:\\\\\\\\\\\\\\\\\\\\\\\\\\\\\\\\ProgramData\\\\\\\\\\\\\\\\\\\\\\\\\\\\\\\\Microsoft\\\\\\\\\\\\\\\\\\\\\\\\\\\\\\\\eHome and copy in files from ‘Previous Version’ folder
- Enable & Start these services :-
- “Windows Media Center Receiver Service”
- “Windows Media Center Scheduler Service”
- Restart Media Center
Media Centre displays the wrong size image on my TV
These days, many people are starting to combine technology with entertainment. With the advent of such media rich entertainment, many people find they’re being weighed down with ‘boxes’ like their satellite box, mp3 player, blu ray player etc. This is why several people opt for use of Windows Media Center which combines all of the features of popular formats of media as well as allowing full screen, streaming HD content direct from the Internet.
In our opinion, one of the best TV ranges for use with such as set up is the Panasonic Viera. This article uses the TH42PH60 (42″ plasma) for illustration purposes.
One of the major problems when connecting a PC to a TV is that the dimensions of the image signal differ, the PC expects standard screen dimensions but the PC only expects an incoming signal in 4:3 ratio, not the usual Wide-screen TV format.
For that reason, you need to ensure that your graphic card allows both custom resolutions as well as over and under-scanning of the TV signal, which allows you to shrink or expand the image to ensure the image files the screen.
To do this, using an AMD/ATI Radeon 4600 graphics card on a Vista Media Center:
- Open the ATI Control Centre
- Ensure you use the advanced Control Panel
- Change the resolution to the closest which matches 1248 x 700 using the list of standard, supported formats
- Click ‘Apply Format’
- Click ‘Add’ to add a custom resolution
- One the custom adjustment screen, alter the dimensions to 1248 wide by 700 high
- Click Apply
- Select the new format in the list and click ‘Apply Format’
- The screen will now adjust and be a perfect fit for the display panel
Every screen is different and has different input resolutions and output dimensions so check the user manual for supported dimensions. The above instructions will also vary depending on the graphics card however they are a good starting point for most Media Center set ups.
Using Previous Versions in Windows
Microsoft have introduced an invaluable feature within its Windows Vista Operating System which allows users to restore backup copies of their own files.
At scheduled periods during the day, your computer creates a ‘shadow copy’ of files which have changed during the day, thereby creating the ability to restore a file or folder to how it was on a Previous Version.
To check and restore a files to an earlier time:
- Open Windows Explorer
- Navigate to the folder where your file is located
- Right-Click on the file
- Select ‘Properties’
- Click on the ‘Previous Versions’ tab
- Your PC will show the following screen while it checks for previous versions of the file:
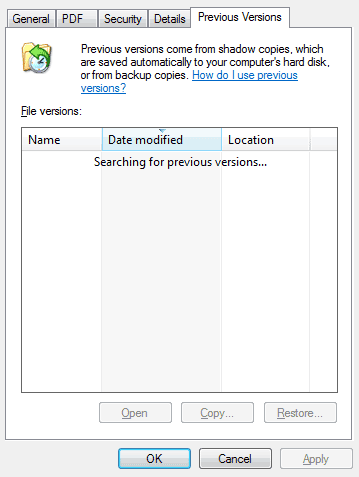
- If your file has been backed up using Microsoft’s ‘Shadow Copy’ system, you will see a list of previous version of the file as shown:
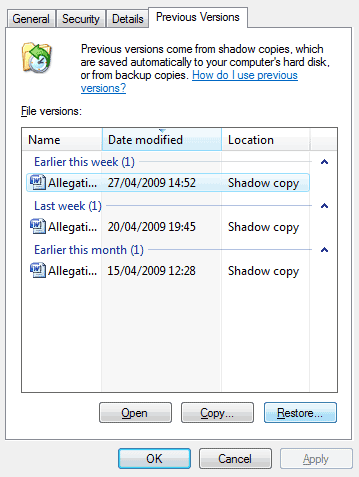
- If your file has not been backed up, you will see this screen:
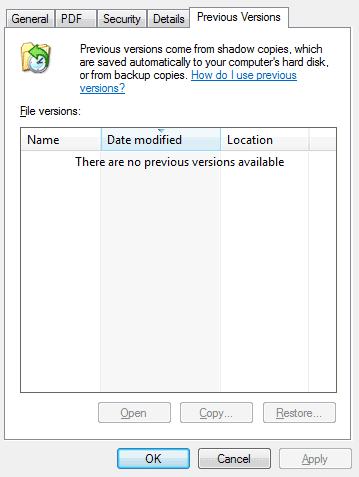
- Highlight the copy of the file you wish to restore
- Click ‘copy…’
- Select a location to save the file for example your desktop
- Click OK.
- When the process is complete, your file will appear and you can click ‘Cancel’ or ‘OK’ on the Previous Versions dialogue to complete the process.
NB: Not all files will have copies, only documents worked on within a recent period of time have backups. Do not click ‘restore’ as this will overwrite your existing file, its always best to ‘copy’ and get ride of the version you don’t need.
How do I make the text bigger on my screen?
Sometimes, you may need to change the size of the font and icons on-screen or make things appear larger or smaller when using your monitor. This process involves changing the resolution of the screen.
To change the resolution, follow these instructions:
- Start your PC
- Log in as normal
- Right-click on the desktop (on an empty area)
- Select ‘Properties’ and you should see the following screen:
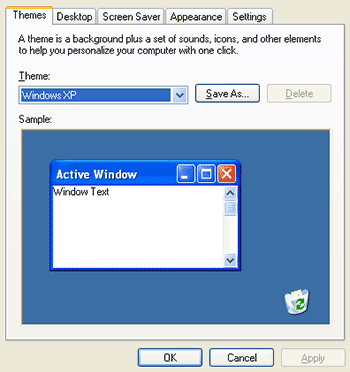
- Using the tabs on the top, select the ‘Settings’ tab:
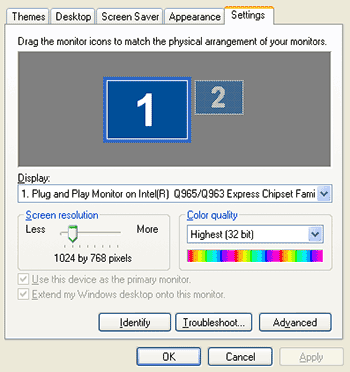
- You will see a ‘slider’ which you should move to select an appropriate resolution. The higher the values, the
smaller things will appear, the lower the values, the larger they will appear.
- Click ‘Apply’ when you’ve chosen a resolution you are happy with
- Click ‘OK’
- The monitor will now adjust the resolution and the display image will change.
N.B: You may receive a message stating that Windows is changing the resolution, if you wish to keep
the current setting, click yes. On this srcreen, select ‘Yes’. If you do not accept the message or you
click ‘no’, within 30 seconds, the screen will revert to the previous setting.
I’m having trouble starting my PC
Sometimes, when you turn on your PC, you may receive a message informing you that the PC won’t start.
These screens differ from a
BSOD
as they are not blue. The messages appear on a black screen and are usually simple to resolve.
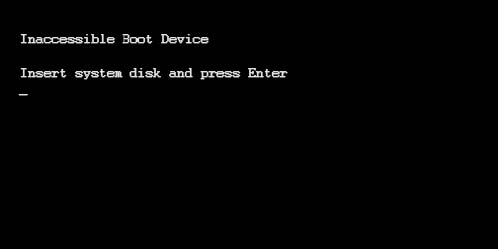
‘Inaccessible boot device’ normally means that you have a CD, Floppy Disc or USB Stick in the machine which is confusing the PC and stopping it from starting. Remove all of the above and reboot the PC. This should resolve the problem. If it doesn’t,
let the us know
and we will be in touch as soon as possible.
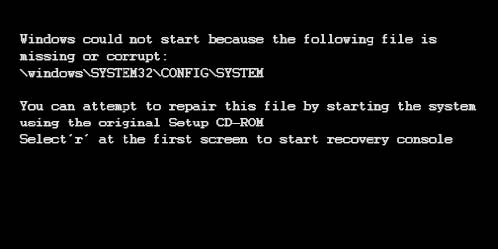
Missing files can be caused by a number of reasons. Usually these faults occur after a software installation or Windows Update. Sometimes, during these processes, system files can be damaged or deleted from the machine which is confusing the PC and stopping it from starting. If this fault occurs,
let the us know
and we will be in touch as soon as possible to try and repair the missing file.

NTLDR is the main file responsible for loading Windows. If this file is missing, your PC will not boot until it is replaced. This usually involves
re imaging
your PC which will erase the contents of the PC. For this reason, always ensure you store your files on a secondary hard drive or other media as a backup such as CD-ROM or USB Memory Stick. If this fault occurs,
let the us know
know and we will be in touch as soon as possible.
N.B: None of these faults can be fixed remotely and will therefore involve collection of the computer to resolve the issue.
In a
previous Self Help document
, we showed you how to backup your DVDs. This is useful for a number of reasons. Using the same files you saved when backing up your DVD, you can add the film into Windows Media Center, enabling you to watch the film directly on your PC or media center without the need for the original DVD.
To add files to Media Center in this way, you must first download and install
My Movies
. You will need the Server and Client version if you just have a stand-alone PC (the norm for most setups).
My Movies
is very useful and offers other versions of the application so check the website for more details.
Once you have downloaded and installed
My Movies
, follow these instructions to add the files to your Movie library within Media Center:
- Open My Movies Collection Management from your Start Menu
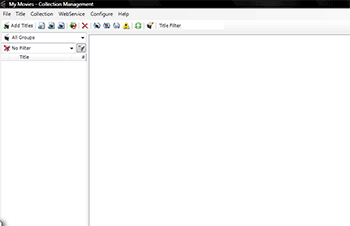
- Click the ‘Add Titles’ button on the menu bar and you will see the following screen:
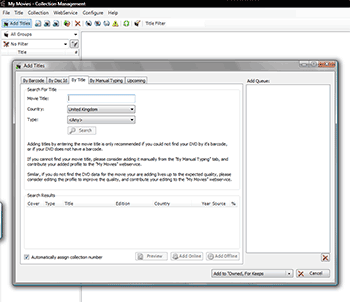
- Ensure that you select the ‘By Title’ tab at the top of the ‘Add Titles’ window
- In the ‘Movie Title’ box, enter the name of the film which you have backed up
- Select ‘United Kingdom’ from the ‘Country’ drop-down and leave the ‘Type’ set to ‘Any’ (this will list films of any type such as DVD, Blu-Ray etc)
- Press the ‘Search’ button
- Once the search is complete, you will see matching results for your film in the bottom screen:
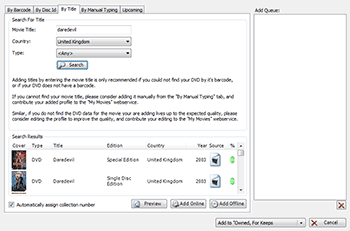
- Scroll down the list of matching results and find the best match for your film. Try to only use films with the green ‘blob’ next to them. This signifies that all of the movie information has been completed so your database will be more accurate and useful
- Highlight the title which matches your film most closely and click the ‘Add Online’ button (this means it will save the film as being stored on your computer. Offline means that you have the DVD and want to add it to your collection but you don’t want to save the files to your PC)
- In the box which appears, point to the location of the main movie folder and highlight the main folder (do not select the AUDIO or VIDEO folders):
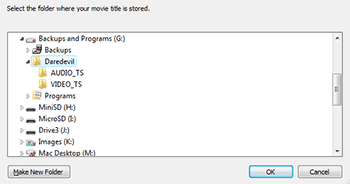
- Click ‘OK’
- You will see your film title appear in the ‘Add Queue’ on the right-hand side
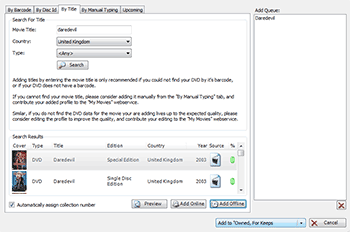
- Press the ‘Add to “Owned For Keeps”‘ button and My Movies will download all of the information, including the covers for your selected film
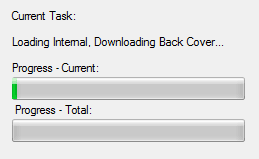
- If there are actor profiles which are new available, My Movies will ask if you want to download this information, click ‘Yes’

- My Movies will download the information
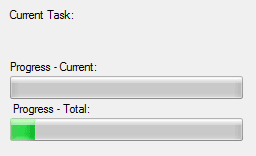
- Once the download is complete, click the ‘OK’ button:
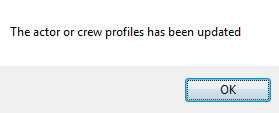
- You will be returned to the main screen showing your new movie information:
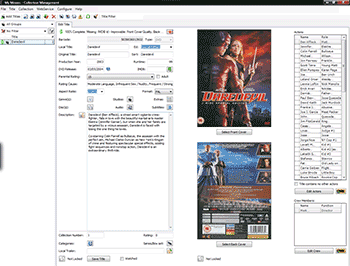
- Add any other titles in the same way and when you’re finished, close ‘My Movies Collection Management’
- Open Media Center and choose ‘My Movies’ from the welcome screen
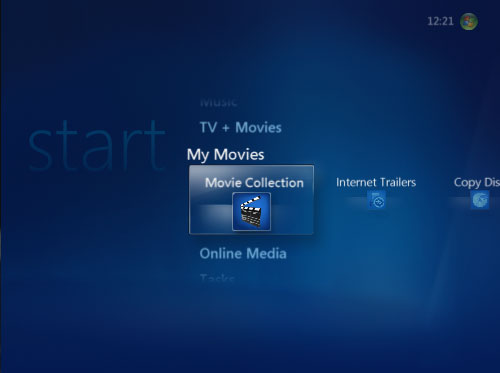
- You should see your new title appear in the list of movies:
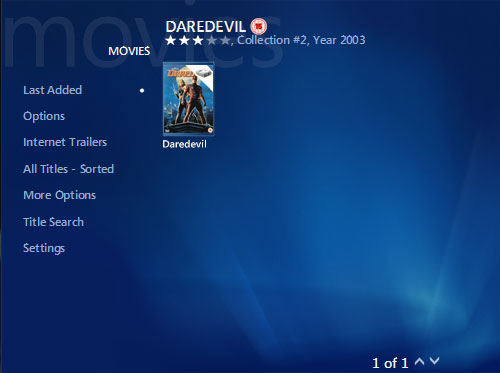
- Select the title and press the ‘OK’ button or select the title with your mouse to view the in-depth information:
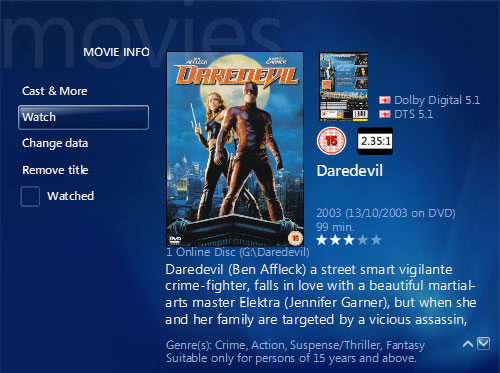
- Ensure that the information is correct, pay particular attention to the file location, shown under the title, e.g: ‘G:\Daredevil’. If the film isn’t located in the correct place, it won’t play.
- To watch the film, simply press the ‘Watch’ button
- That’s it! The film or program has been saved to your collection!

